In order to use ePNJPOS,
the account needs Receipt, Terminals and Clerks to be configured for use. This
section covers setting up and managing the ePNJPOS account through the eProcessingNetwork
Merchant Service Center.
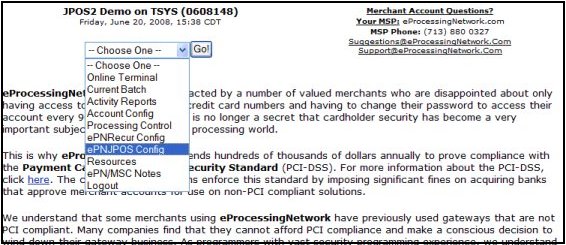
Figure 4–1 Go!
Menu
Select ePNJPOS Config
from the Go! menu, then click Go! to manage the ePNJPOS
account settings.
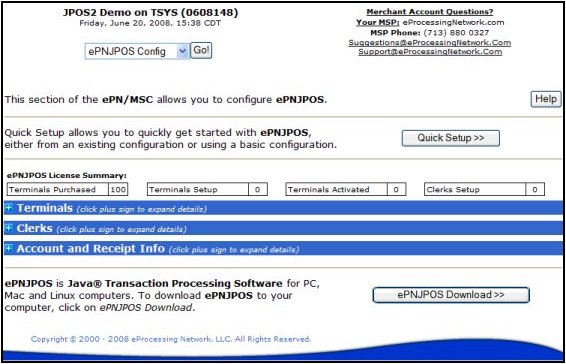
Figure 4–2 ePNJPOS
Config Screen
Figure 3–2 shows the ePNJPOS
Config Screen.
- The Help button
displays a new window or tab in your browser with help for using ePNJPOS,
as well as very useful walk-throughs from the eProcessingNetwork
Merchant Tour Guide.
- The Quick Setup
button is only displayed when the account is new and un configured. It is
explained in detail in Section 3.1 Quick Setup.
- ePNJPOS License Summary
lists a summary of licenses purchased for and in use for the account.
- Terminals Purchased - The purchased ePNJPOS licenses.
- Terminals Setup - Number of added terminals up to Terminals
Purchased.
- Terminals Activated - Number of terminals activated (installed
and set up on a computer).
- Clerks Setup – Number of clerks configured on the
account. There are no limits for the number of clerks that can be set up
on an account.
- Terminals is a collapsed section to allow management of
the terminals. It is explained in Section 3.2 Terminal Management.
- Clerks is a collapsed section to allow management of
clerks. It is explained in Section 3.3 Clerk Management.
- Account and Receipt
Info is a collapsed section
to configure general account information and information to display on
receipts. It is explained in Section 3.4 Account and Receipt Info.
Quick Setup assists in
initial configuration of the account using a general template for all settings.
From the template the account will have the first terminal and a manager clerk
added.
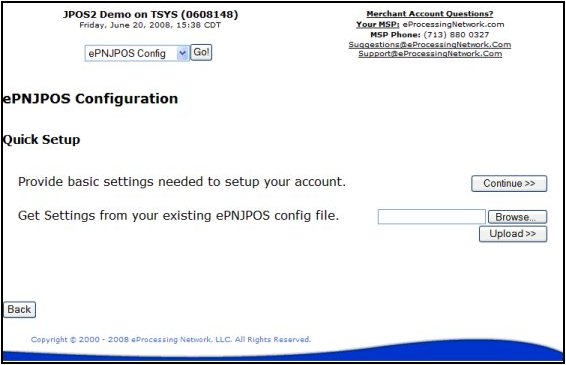
Figure 4–3 Quick
Setup Main Screen
Clicking the Continue
button will proceed with the basic Quick Setup (most useful for merchants
that are new to ePNJPOS), which is outlined in Section 3.1.1 Quick
Setup Basic.
The Upload button
will allow a merchant to upload the configuration file from an installation of
the original ePNJPOS to provide many of the settings required. This
procedure is outlined in Section 3.1.2 Quick Setup from Configuration File.
Quick Setup Basic asks for
Account Information only, and then uses the template for the rest.
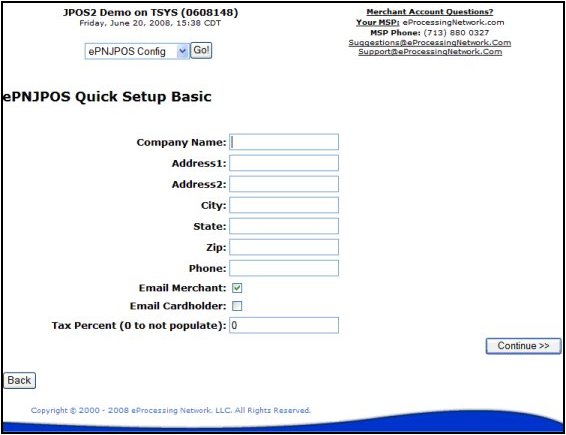
Figure 4–4 Quick
Setup Basic
To complete Quick Setup
Basic, simply complete this form, and then click Continue.
- Email Merchant – Check this box to receive an email for
every transaction processed through ePNJPOS. Messages will be sent
to the email address (es) configured in Account Config in the eProcessingNetwork
Merchant Service Center.
- Email Cardholder – Check this box to have an electronic receipt
emailed to the cardholder when the optional Email field is filled
in on a transaction form.
- Tax Percent – To have ePNJPOS automatically calculate the
tax percentage (e.g. for 8.25% enter 8.25), to manually enter tax amount
or leave tax zero, enter 0.
To setup using settings
imported from the older version of ePNJPOS, use this option. It will pull
as much information as possible from the imported configuration file, add a
manager clerk, and add a terminal for each terminal previously activated under
the old version.
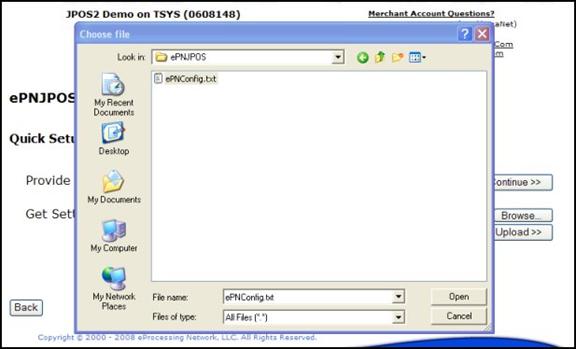
Figure 4–5 Select
Old Configuration File
To use this method, click
Browse, then select the ePNConfig.txt file from the installation directory of ePNJPOS.
The standard install directory is:
C:\Program Files\eProcessingNetwork\ePNJPOS
Please note that the
standard setting in Windows hides the .txt file extension, so the file will
typically be listed as ePNConfig with a text file icon ( ). Click Open, then click Upload
to perform the setup.
). Click Open, then click Upload
to perform the setup.
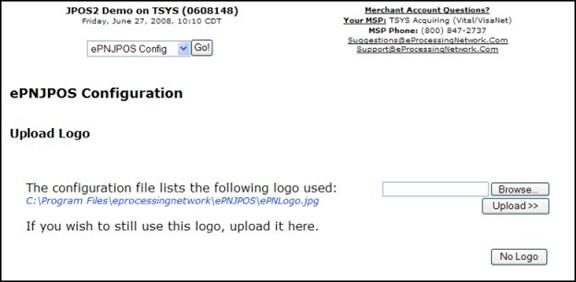
Figure 4–6 Upload
Logo
If Quick Setup
finds a logo in the configuration file, the Upload Logo screen will be
shown. The blue text shows the location of the image used in the previous
version of ePNJPOS. Click Browse and select the same or a
different image, then click Upload to use a logo, or click No Logo
to skip this step.
The Terminals
section is used to add and configure terminals for activation on PC’s.
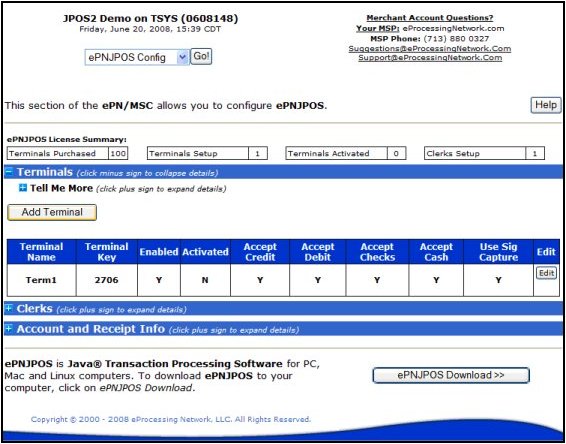
Figure 4–7 Terminals
Screen
Add Terminal will add a
new basic terminal to the list.
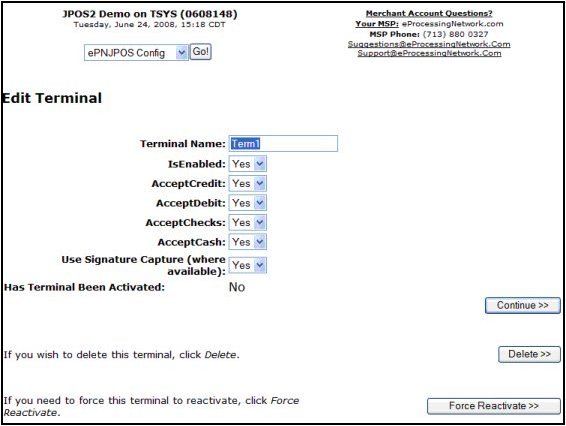
Figure 4–8 Edit
Terminal
The Edit button
shows the Edit Terminal screen. From here all general setting for the
terminal’s capabilities are set.
- Terminal Name – This
field is for informational purposes and a meaningful name is suggested.
- IsEnabled – Whether the
terminal can connect and run transactions or not.
- AcceptCredit – Can
credit transactions be run from this terminal?
- AcceptDebit – Can debit
transactions be run from this terminal? Currently only supported with the
Ingenico i6550 peripheral, otherwise ignored.
- AcceptChecks – Can check
transactions be run from this terminal? Merchant account must have check
service enabled on their account, or setting will be ignored.
- AcceptCash – Can cash
transactions be run from this terminal?
- Use Signature Capture –
Will terminal request signature capture. Currently only supported with the
Ingenico i6550 peripheral, otherwise ignored.
- Has Terminal Been
Activated – When ePNJPOS is installed on a PC, it activates the
installation as a terminal. If ‘Yes’, this indicates that this terminal
has been activated on a PC.
The Delete button
will delete this terminal from the account. The Force Reactivate button
sets Activated to ‘No’, which will cause ePNJPOS on the PC
registered as that terminal, to request activation. Useful when changing
computers for a particular terminal, or reinstalling ePNJPOS.
The Clerks section is for
managing ePNJPOS users for the account. There are two types of users:
- Clerks – The standard
user, for anyone that will be using the terminal.
- Managers – A special
user that has permission to activate and configure terminals, as well as
run standard transactions.
It is possible to have a
Manager that cannot run transactions, useful for IT staff.
An account may have as
many clerks and managers as required by the merchant.
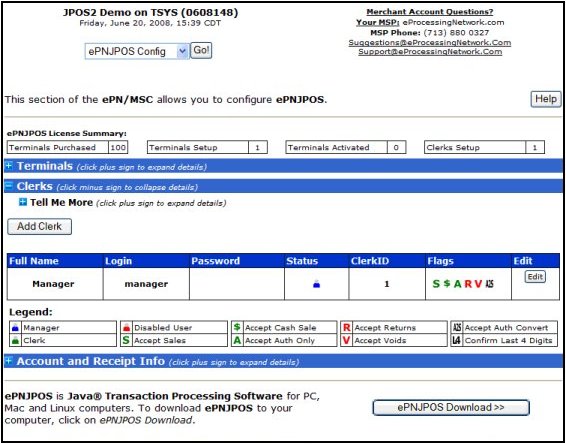
Figure 4–9 Clerks
Section
Clicking Add Clerk will
add a deactivated clerk to the list.
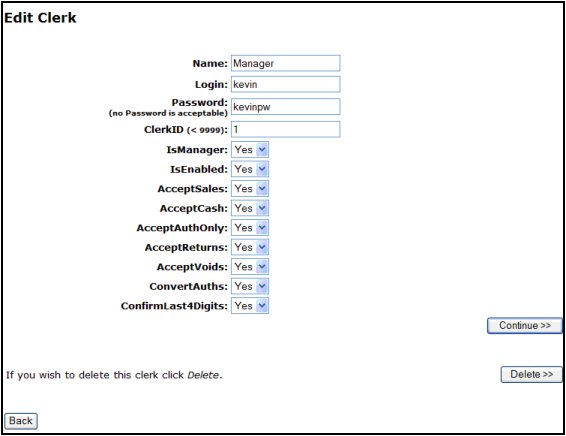
Figure 4–10 Clerk
Edit
The Edit button
shows the Edit Clerk screen. From here all general setting for the clerk
are set.
- Name – The name field is shown at the top of the ePNJPOS
window after login, and can be displayed on the receipt.
- Login – Case sensitive username for logging in to ePNJPOS
terminals.
- Password – Optional password for logging in to ePNJPOS
terminals. It is recommended to have a password for manager accounts. The
password is shown in clear text on the account list, but is only visible
to users logged in to the eProcessingNetwork Merchant Service Center.
- ClerkID – This will be recorded with the transaction
and can be filtered on in the Activity Reports section of
the eProcessingNetwork Merchant Service Center. It is recommended
to use a unique ClerkID for every clerk.
- IsManager – Set this clerk as a manager.
- IsEnabled – Disabled clerks will not be able to log in
to ePNJPOS terminals.
- AcceptSales – Can this clerk process sale transactions.
- AcceptCash – Can this clerk process cash transactions.
- AcceptAuthOnly – Can this clerk process authorize only
credit card transactions?
- AcceptReturns – Can this clerk process return transactions?
- AcceptVoids – Can this clerk process void transactions.
- ConvertAuths – Can this clerk convert authorize only
transactions to sale transactions?
- ConfirmLast4Digits – Will this clerk be present with a request
to confirm the last four digits of the credit card. This is a useful
security feature to validate that the physical card is present and that
the card information on the MagStripe matches the imprint on the card.
The Delete button
will remove this clerk from the account.
The Account and Receipt
Info section allows fro general setup of information that is displayed on
receipts and optional email receipts.
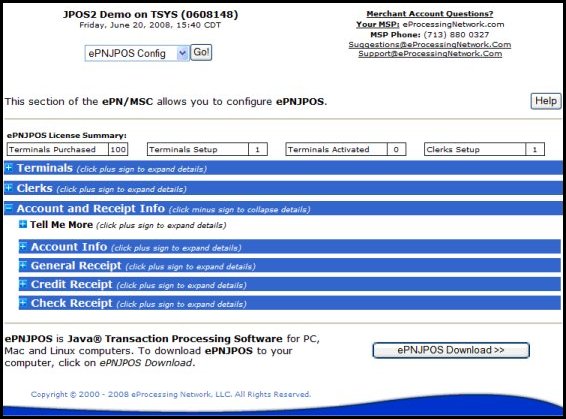
Figure 4–11 Account
and Receipt Info Section
This section is for the
account information. It is the same information set up during the Quick
Setup, however if the Upload Config method was used, it may be
incomplete.
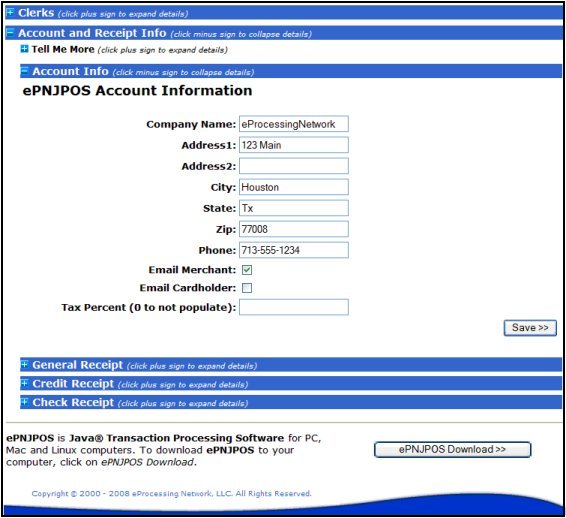
Figure 4–12 Account
Info Configuration
Company Name and address
information will be displayed on the receipt.
- Email Merchant – Check this box to receive an email for
every transaction processed through ePNJPOS. Messages will be sent
to the email address (es) configured in Account Config in the eProcessingNetwork
Merchant Service Center.
- Email Cardholder – Check this box to have an electronic receipt
emailed to the cardholder when the optional Email field is filled
in on a transaction form.
- Tax Percent – To have ePNJPOS automatically
calculate the tax percentage (e.g. for 8.25% enter 8.25), to manually
enter tax amount or leave tax zero, enter 0.
These settings control
what will be displayed on all receipts.
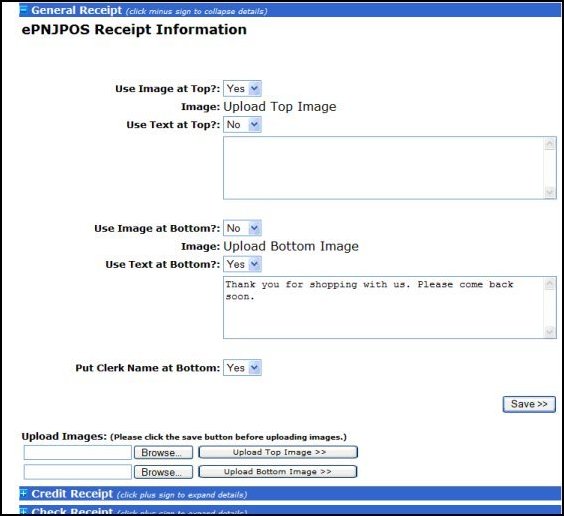
Figure 4–13 General
Receipt Config
- Use Image at Top – If a top image has been uploaded and this
field is set to ‘Yes’, the uploaded image will be printed at the top of
the receipt. The current image is displayed next to Image.
- Use Text at Top – This text will be displayed at the top of
the receipt, below the top image if set to ‘Yes’.
- Use Image at Bottom – If a bottom image has been uploaded and
this field is set to ‘Yes’, the uploaded image will be printed at the
bottom of the receipt. The current image is displayed next to Image.
- Use Text at Bottom – This text will be displayed at the bottom of
the receipt, above the bottom image if set to ‘Yes’.
- Put clerk Name at
Bottom – If set to ‘Yes’, the
Name field from the logged in clerk will be printed at the very
bottom of the receipt.
The Upload Images
section is for uploading the top and bottom images. If changes have been made
to the top section, they will be lost when either Upload button is
clicked. Click Save first, then come back and upload the images, or
upload images first.
To upload and image, click
Browse to select the desired image, and then click the Upload
button next to it to upload to the appropriate image location. Only .gif and
.jpg images are accepted.
This configures the
additional information that can be displayed on credit receipts.
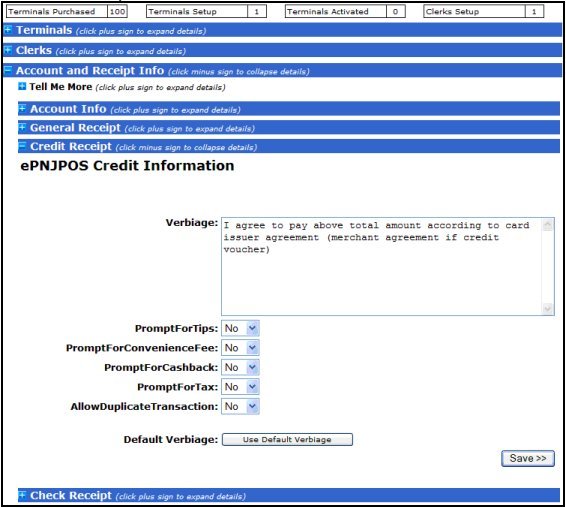
Figure 4–14 Credit
Receipt Config
The verbiage text will
appear towards the bottom of the receipt, after the signature line, and before
the bottom text and image. To not display additional verbiage on the receipt,
leave this field blank.
- PromptForTips – Will ePNJPOS prompt for a tip amount
after credit card is entered? Will print a merchant receipt for Tip, Total
and signature, then customer receipt after approval.
- PromptForConvenienceFee
– Convenience Fee is used to
add a surcharge to the total. Convenience Fee takes priority over Tips,
i.e. if both are set to ‘Yes’, only a Convenience Fee will be asked for.
- PromptForCashBack – Ask for cash back amount on debit
transactions.
- PromptForTax – Ask for tax amount. If Tax Percentage in
Account Info is set, the tax amount will be automatically calculated, and
editable.
- AllowDuplicateTransactions
– Allow to transactions in
the same batch for the same amount on the same card number.
The Default Verbiage
button sets the verbiage text to the default value.
This configures the
additional information that can be displayed on credit receipts.
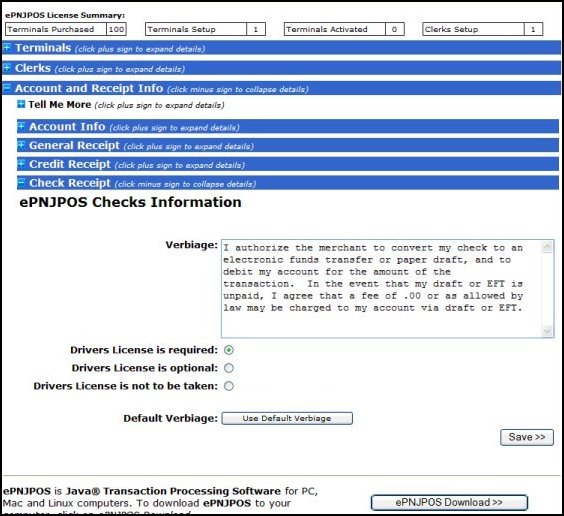
Figure 4–15 Check
Receipt Config
The verbiage text will
appear towards the bottom of the receipt, after the signature line, and before
the bottom text and image. To not display additional verbiage on the receipt,
leave this field blank.
Drivers License may be one
of three states:
- Required
– Clerk must enter driver’s license information.
- Optional
– Clerk may enter driver’s license information, but is not required.
- Not to
be taken – Clerk may not enter driver’s license information.
The Default Verbiage
button sets the verbiage text to the default value.